 Figure 1: Diagram of the sign.
 Our paper is based on a bright LCD display 1 line of 16 characters (with HD44780 driver): it can display a scrolling text stored in a microcontroller using a manual procedure (see below) to four buttons (three Enter commands more) placed on the back of the module. The microphone is a PIC16C505 already programmed at the factory whose resident program manages the LCD. After power up and initialization of I / O, the PIC waits (sleep mode) and only consumes almost nothing (a few uA). It reads the ENTER button (SW4) to check if it has been pressed, and when that happens, he starts to run its regular program and control line status RB1, RB2, RB3, RB5 and thus push, if one of them is pressed it activates the function and launch the program in question. SW4 is the push standby / ON when the circuit is at rest, but during the proceedings, it serves to confirm choices.
programming procedures
See the behavior of the ICP at the time of setting; to power the mic and prepares displays the first word of the menu or EDIT MESSAGE: A new pressure on SW4 (ENTER) to access the settings of the marquee, with a first press UP (SW1), we pass to the function SHOW MESSAGE (displays the message currently stored), with a second one arrives to SET SPEED (setting the speed of the message) and a third one can turn off the circuit (POWER OFF).
In this first phase (presentation of menus) is active only SW1; each presentation of a word, to launch the corresponding parameter, you must press the ENTER button (SW4).
When pressed this button and it appears POWER OFF, the microphone is placed on hold and the LCD off. But see how to get the message after pressing ENTER when the LCD displays EDIT MESSAGE, at which point you can select the characters one by one using the buttons UP, DOWN, SPACE: The first two of these buttons scroll through the top and down the bank of letters, numbers and symbols and SW2 inserts a space after the character currently selected. The symbol to be selected is displayed in the rightmost position.
Each time we showed the character you want, it is confirmed with ENTER, and you write a letter after another, the sentence to view.
When the message is complete, you must scroll in the library of characters to select the one which in the initial menu EDIT MESSAGE lies beside END (blackspace), then press SW4 (ENTER) to confirm and return to menu EDIT MESSAGE, which can be returned (out of the compilation of the message) at any time by pressing all the buttons and ENTER SPACE.
To see the scrolling message, you must position themselves SHOW MESSAGE and press ENTER, if the message is correct, the setup is done, otherwise by pressing UP the number of times necessary to return EDIT MESSAGE SW4 is pressed (ENTER) and it compiles the text again.
The SET SPEED can set the speed of the text: when the display shows the word menu, pressing ENTER you can see the text scrolling on the LCD.
Pressing UP or DOWN it speeds up or slows down the speed.
When the speed you want is achieved, press ENTER (SW4), which brings you to visualize the words EDIT MESSAGE.
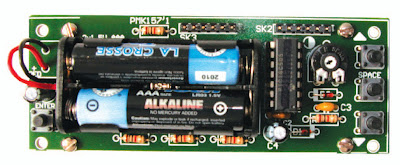
 Figure 2: Photograph of a prototype of the plate on the sign, which takes place on the component side compartment for two batteries AAA (set by a small bolt).
 We see the four buttons and setting trimmer brightness.
Iist EV157
R1 ..... 10 kW
R2 ..... 10 kW
R3 ..... 10 kW
R4 ..... 10 kW
R5 ..... 10 kW
RV1 .... 1 kΩ trimmer
C1 ...... 100 uF 25 V electrolytic
C2 ...... 100 nF multilayer
C3 ...... 100 nF multilayer
C4 ...... 1 uF 100 V electrolytic
D1 ..... BAT85
D2 ..... BAT85
AF1 .... LCD 16 x 1
IC1 .... PIC16C505-EV157
SW1 .... micropoussoir
[...]
SW4 .... micropoussoir
Miscellaneous:
A battery holder for 2 x AAA
1 support 2 x 7-pin
The practical realization
Affordable by a beginner, the construction of this LED board will not be a problem to a careful person.
All necessary components (with micro programmed and printed circuit etched) are available from certain advertisers of the magazine.
A single setting, the brightness of the display with RV1. You just have to learn how to configure the device with four buttons.


No comments:
Post a Comment